 Save to Pinterest
 I'll never forget the Christmas Eve my aunt pulled out a platter of these cheese ball ornaments at our family gathering. They were so beautiful, catching the light like real decorations, that nobody wanted to eat them at first. But once someone brave enough took that first bite, the platter disappeared faster than wrapping paper on Christmas morning. That's when I knew I had to learn her secret and make them my own for every holiday celebration since.
I remember standing in my kitchen three days before Thanksgiving, my hands covered in cream cheese, rolling these little balls while my daughter painted the whole platter with different colored coatings. We laughed at the mess we made, but when we stepped back to look at what we'd created, we both stood there in quiet amazement. Those ornaments became the star of our table that year, and now every holiday season feels incomplete without them.
Ingredients
- Cream cheese, softened: This is your foundation, so let it sit at room temperature for at least 30 minutes before you start. Cold cream cheese will make mixing impossible and your mixture grainy instead of silky smooth.
- Sharp cheddar and mozzarella cheese: The combination of these two gives you that complex cheese flavor without being overwhelming. Sharp cheddar brings the bite while mozzarella keeps everything creamy and cohesive.
- Fresh chives: Don't skip this. That subtle onion note is what makes people pause and ask what's in here. Finely chop them so they distribute evenly throughout.
- Dijon mustard: Just one tablespoon, but it's the secret ingredient that makes every single bite taste more sophisticated. It adds depth without making anything taste mustardy.
- Garlic powder: A light touch here keeps the cheese ball savory and interesting. I learned the hard way that fresh garlic doesn't work as well because the moisture throws off the texture.
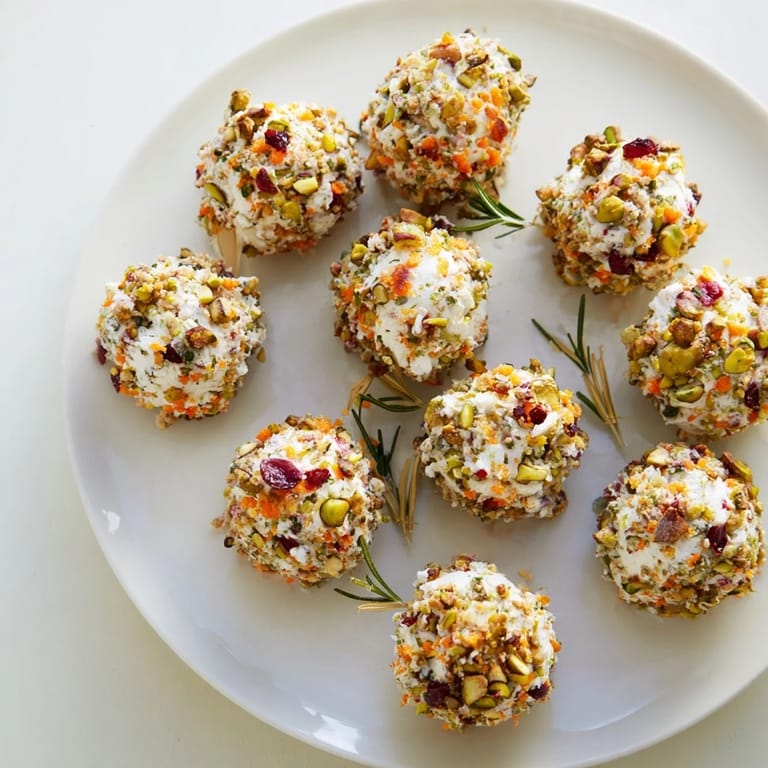
- Pistachios, cranberries, poppy seeds, parsley, red peppers, and walnuts: These coatings are your chance to be creative. Each one adds visual contrast and a different flavor profile. I always choose at least three colors to make the platter pop.
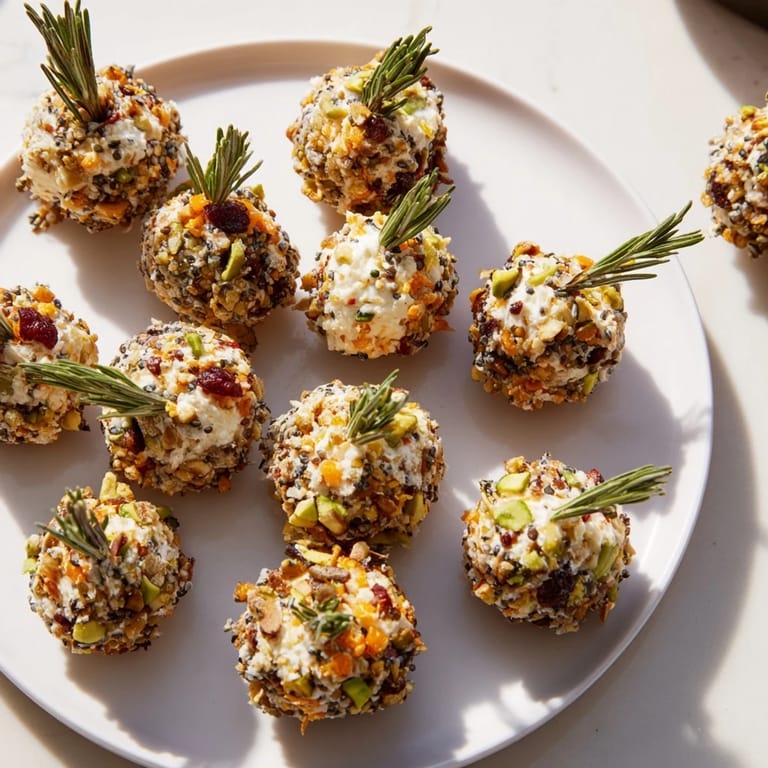
- Fresh rosemary sprigs: These are the magic touch that makes them look like hanging ornaments. Find small, tender sprigs that aren't too woody, and make sure they're fresh because dried ones look dull.
Tired of Takeout? 🥡
Get 10 meals you can make faster than delivery arrives. Seriously.
One email. No spam. Unsubscribe anytime.
Instructions
- Prepare your canvas:
- In a medium bowl, combine your softened cream cheese, both cheeses, chives, Dijon mustard, garlic powder, salt, and pepper. Start mixing gently, then increase the vigor of your stirring. You want everything incorporated and smooth with no streaks of cream cheese visible. This should feel creamy and spreadable, almost like frosting.
- Portion with intention:
- Divide the mixture into 12 equal portions. I use a small cookie scoop for consistency, but you can eyeball it if you're comfortable. Roll each portion between your palms into a smooth, tight ball. If the mixture is too soft, pop everything in the fridge for 15 minutes and try again.
- Create your coating stations:
- Place each coating ingredient in its own shallow bowl. This step might feel tedious, but it's what makes the process smooth and prevents flavors from mixing. Line your bowls up in rainbow order if you're feeling fancy.
- Roll and coat with style:
- Roll 3 or 4 cheese balls in each coating, pressing gently so the coating adheres but doesn't squish the ball. You'll notice some coatings stick better than others. The finely chopped ones cling beautifully while the poppyseeds create a polka-dot effect. This is where it gets fun.
- Arrange your edible ornaments:
- Group your coated balls in clusters of 3 or 4 on your serving platter, leaving a little breathing room between clusters so they look intentional and beautiful. Think about color balance as you arrange them, mixing different coatings so the eye travels across the platter.
- Add the finishing hook:
- Insert a small rosemary sprig into the top of each cluster, angling it slightly like a little hook. These sprigs are what transform your creation from fancy cheese balls into actual ornaments. Fresh rosemary also smells incredible, so people's senses get engaged the moment they see the platter.
 Save to Pinterest
 My neighbor came over the day I was making these for a party and watched the whole process. She left with a container of them in her hands, looking more excited than she had in months. The next week, she made them for her Sunday school class and told me they were the hit of the potluck. That's when I realized this recipe doesn't just make good food, it creates moments where people feel celebrated.
Make-Ahead Magic
The beauty of this recipe is its flexibility with your schedule. You can prepare everything days in advance and just assemble on the day of your event. Form all your cheese balls and freeze them on a baking sheet for up to a week. Prepare your coatings in individual containers in the fridge. Then, just 30 minutes before your guests arrive, roll them in their coatings and arrange them on the platter with their rosemary hooks. Everything tastes just as fresh and looks just as stunning, but without the last-minute stress.
Coating Combinations That Work
After making these dozens of times, I've discovered which coating combinations create the most visually stunning and flavorful results. The pistachios give a sophisticated green that photographs beautifully and adds a subtle earthiness. The dried cranberries provide a pop of festive red and a slightly tart sweetness that cuts through the richness of the cheese. The poppy seeds create an elegant speckled pattern and add a nutty flavor. Parsley brings a fresh herbaceous note that most people don't expect. Fresh roasted red peppers add natural sweetness and gorgeous color, though they must be finely chopped to avoid slipping off the balls. Walnuts create a darker, earthier tone that contrasts beautifully with brighter coatings. Choose your favorite combination, but always use at least three different coatings for maximum visual impact.
Serving Suggestions and Flavor Pairing
These ornaments shine brightest when you give them room to be the star. Serve them on a bed of fresh greenery or clustered on a wooden board where the colors really pop against the natural wood. Pair them with unsalted or lightly salted crackers so the flavors of the cheese balls remain front and center. A sliced baguette works beautifully if you want something more substantial. Some of my favorite pairings include sparkling water with cranberry to echo the flavors, crisp white wine like Sauvignon Blanc, or even a light festive punch that doesn't compete with the savory cheese.
- Toast your baguette slices lightly to add a textural contrast and slight caramelization that makes every bite more interesting
- Arrange your platter at eye level where people naturally gather so they can admire them before eating
- Keep a small spoon nearby for guests who want to spread rather than try to balance a ball on a cracker
 Save to Pinterest
 Every time I make these, I'm transported back to that Christmas Eve when my aunt's platter created such joy. Now I know it's not just about having something delicious on the table, it's about creating something beautiful enough to make people pause and smile.
Common Recipe Questions
- → How do I make the cheese clusters stick together?
Use softened cream cheese as the base to bind the shredded cheeses and seasonings together, allowing the mixture to hold its shape when rolled.
- → What coatings can I use for variety?
Try coatings like chopped pistachios, dried cranberries, poppy seeds, parsley, roasted red peppers, or walnuts for color and texture contrasts.
- → Can I prepare these ahead of time?
Yes, mix and shape the cheese balls and store them separately from coatings. Assemble the clusters shortly before serving to maintain freshness.
- → How do the rosemary sprigs enhance the presentation?
They act as natural hooks, giving each cluster the look of a hanging ornament, adding a festive and elegant touch to the platter.
- → Are there any dietary considerations?
This dish is vegetarian and can be gluten-free when paired with gluten-free crackers; be mindful of nut allergies if using certain coatings.