 Save to Pinterest
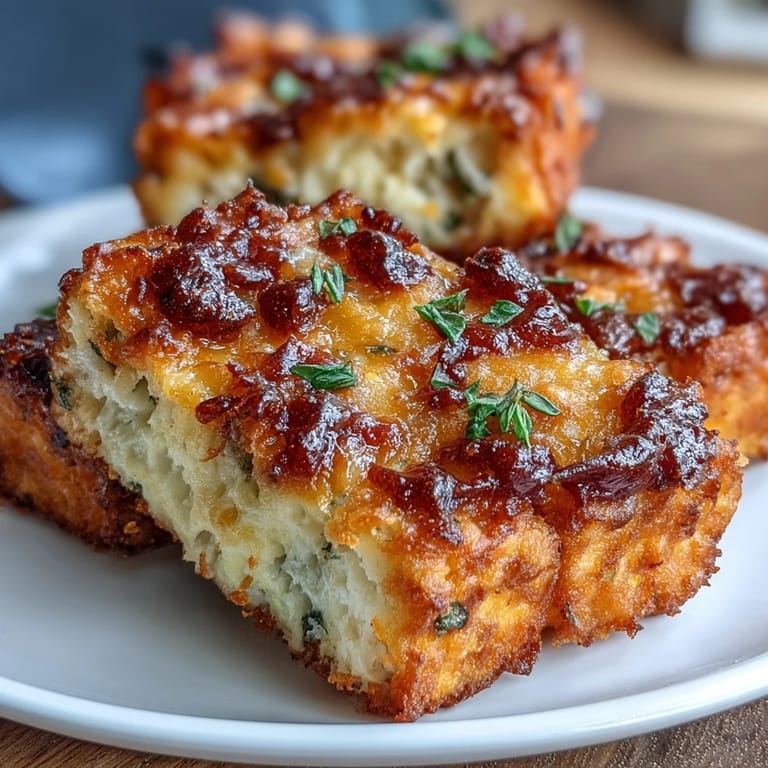
 My neighbor brought a tin of these to our Kentucky Derby watching party, and I spent half the afternoon ignoring the actual race while sneaking them from the coffee table. There's something almost irresistible about a crispy, buttery cheese straw—the way it shatters between your teeth, the sharp bite of cheddar mixed with that subtle cayenne heat. After my third handful, I finally asked for her recipe, and she laughed, saying she'd perfected it over years of Derby Day gatherings. Now I make them every spring without fail, and they've become my secret weapon for winning over skeptics about savory snacks.
I made these last spring when my sister hosted a dinner party she was stressed about, and I volunteered to bring appetizers. When guests arrived and saw the golden straws arranged on a board with some olives and prosciutto, the whole room shifted—suddenly she had breathing room while people grazed and mingled. One guest pulled me aside later asking if I'd catered them, which felt like the highest compliment a home cook could receive.
Ingredients
- Sharp cheddar cheese, freshly grated: Use the box grater yourself rather than pre-shredded, as the anti-caking agents prevent the dough from holding together properly.
- Parmesan cheese, finely grated: The Parmigiano-Reggiano varieties give a much deeper, more complex flavor than domestic brands.
- Unsalted butter, cold and cubed: Cold butter creates those delicate, flaky layers—if it's soft, your straws become greasy instead of crispy.
- All-purpose flour: Don't sift it unless you love dense straws; just spoon it into your measuring cup and level with a knife.
- Cayenne pepper: This is where you control the heat level—start with half a teaspoon and taste a baked sample before committing to more.
- Fine sea salt and freshly ground black pepper: These simple seasonings let the cheese shine without competing flavors.
- Cold water: Keep this on hand for dough that needs a tiny bit of moisture, but add it sparingly or the straws won't crisp properly.
Tired of Takeout? 🥡
Get 10 meals you can make faster than delivery arrives. Seriously.
One email. No spam. Unsubscribe anytime.
Instructions
- Set Your Stage:
- Preheat your oven to 375°F and line your baking sheet with parchment paper so cleanup becomes a nonissue and your straws won't stick. This takes one minute but saves you from scraping the pan afterward.
- Combine Your Dry Elements:
- Add the cheddar, Parmesan, flour, cayenne, salt, and pepper to your food processor and pulse several times until the cheeses are evenly distributed throughout the flour. The mixture should look uniform with no clumps of cheese visible.
- Incorporate the Cold Butter:
- Add your cubed cold butter and pulse until the mixture resembles coarse breadcrumbs—some tiny pea-sized pieces of butter should still be visible. This is where the magic happens, creating those tender, flaky layers.
- Bring It Together:
- If the dough looks crumbly, sprinkle a tablespoon of cold water over it and pulse once or twice until it just barely holds together when pinched. Overworking turns it tough, so stop as soon as it's cohesive.
- Roll Out Your Canvas:
- Turn the dough onto a lightly floured surface and roll it to about ¼ inch thick, aiming for an even rectangle so all your straws bake uniformly. If the dough keeps springing back, let it rest for two minutes.
- Cut With Intention:
- Using a sharp chef's knife or pastry cutter, slice the dough into strips roughly ½ inch wide and 6 inches long, keeping your cuts clean so the edges stay crisp. Wipe your knife between cuts if it gets sticky.
- Arrange for Success:
- Place your strips on the parchment paper with a little space between each one so air circulates and they crisp evenly rather than steaming. Don't crowd them.
- Watch the Magic:
- Bake for 12 to 15 minutes until they're golden brown and smell absolutely incredible, checking around the 12-minute mark so they don't overbake. The exact time depends on your oven's personality.
- Cool Strategically:
- Let them rest on the baking sheet for five minutes before transferring to a wire rack, which allows carryover cooking to finish crisping the insides. This patience pays off in texture.
 Save to Pinterest
 There's a moment when these come out of the oven where your entire kitchen smells like a buttery, cheesy dream, and for those few minutes everything else fades away. My kids actually set a timer now because they've learned that's when they're perfectly crispy, warm enough to eat but cooled enough not to burn their mouths—that's when these stop being just a snack and become something we share together.
Flavor Variations Worth Trying
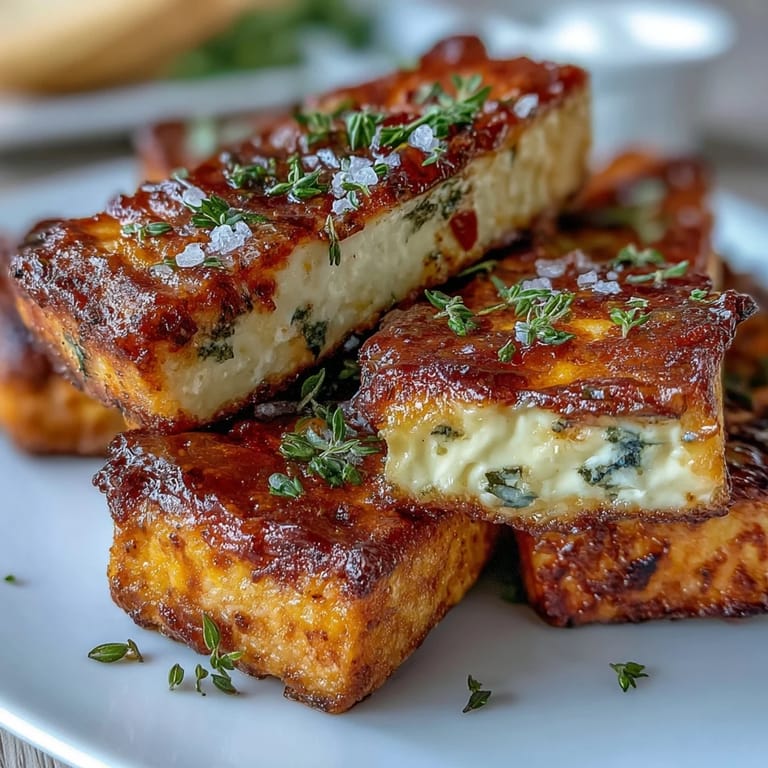
The beauty of this recipe is its flexibility once you master the base technique. I've experimented with smoked paprika sprinkled on top before baking, which adds an almost bacon-like depth without changing the dough itself. Some evenings I'll add freshly grated gruyere instead of half the sharp cheddar for a nuttier, more sophisticated flavor that impresses people who think they don't like cheese straws. Even swapping in just a pinch of garlic powder or dried thyme opens up completely different serving possibilities—suddenly they pair with wine instead of whiskey.
Storage and Make-Ahead Strategy
These actually keep beautifully for up to four days in an airtight container, which is my favorite part about them for entertaining. You can also assemble and cut the straws the day before, then store them in the fridge on parchment paper in a sealed container before baking them fresh—I do this all the time when I know I'll be busy the next day. Avoid the freezer unless absolutely necessary, as thawing can make them release moisture that compromises their crispy texture.
Serving Suggestions and Pairings
While these are perfect alongside a mint julep on Derby Day, they've become my go-to appetizer year-round because they work with almost everything. I've served them with aged cheddar and apple slices, with smoked salmon and crème fraîche, alongside spicy Spanish chorizo, and even just with good butter on their own. Here's what I've learned makes them shine:
- Serve them still slightly warm from the oven, when the butter flavor is most prominent and they're at peak crispiness.
- Keep them in an open bowl rather than covering them, which traps steam and softens them faster.
- Make a double batch because even people who claim they don't want any will find themselves reaching for another straw.
 Save to Pinterest
 These straws have quietly become the thing people ask me to bring to gatherings, which still surprises me because they're so simple. Once you make them once, you'll understand why—they're a rare recipe that's both genuinely easy and genuinely impressive.
Common Recipe Questions
- → What cheeses are used in these straws?
Sharp cheddar and finely grated Parmesan provide a rich and tangy cheese flavor.
- → How does cayenne affect the flavor?
A small amount adds a gentle heat that balances the buttery richness without overpowering.
- → Can these straws be made ahead of time?
Yes, they can be baked in advance and stored in an airtight container to maintain crispness.
- → What’s the best way to achieve a flaky texture?
Using cold butter cut into the flour mixture helps create a tender, flaky dough once baked.
- → Are there any suggested toppings or variations?
Sprinkling smoked paprika on top before baking adds a smoky depth, and twisting strips adds visual appeal.