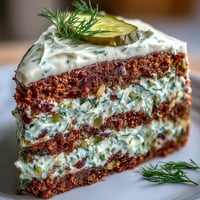
 Save to Pinterest
 I still remember the first time I saw a patchwork quilt hanging in my grandmother's sewing room—vibrant squares of fabric stitched together in perfect harmony. Years later, when I decided to create a cake inspired by that same artistry, I realized the kitchen could be just as creative as a sewing basket. The Cozy Quilt Patchwork Cake was born from that moment of wondering: what if we could eat something as beautiful and comforting as grandma's quilts? Now, every time I make it, I'm transported back to her kitchen, where she taught me that the most memorable things in life are made with love, patience, and a splash of color.
I baked this cake for my daughter's birthday last spring, and watching her face light up when she saw the patchwork design was pure magic. Her friends spent the first five minutes just photographing it before anyone dared to cut into it. That's when I knew this wasn't just a cake—it was a moment we'd all remember.
Ingredients
- All-purpose flour (350 g): The foundation of your cake. Use fresh flour for the best rise, and don't pack it into your measuring cup—let it be light and airy, just like your sponge should be.
- Granulated sugar (300 g): This sweetens the cake and helps create that tender crumb we're after. When creaming with butter, you'll know it's ready when the mixture looks pale and fluffy, almost like clouds.
- Baking powder (2½ tsp): Your secret to a light, airy sponge. Don't skip this or double it—precision matters here more than anywhere else.
- Salt (½ tsp): A tiny pinch that enhances all the other flavors. It sounds small, but it makes a real difference in the final taste.
- Unsalted butter, softened (250 g for cake, 350 g for frosting): Room temperature butter is essential—it incorporates air and creates that perfect tender crumb. Take it out of the fridge about an hour before baking.
- Large eggs (4): Room temperature eggs blend more smoothly into the batter, creating a better emulsion. Cold eggs can make the mixture look curdled and affect the texture.
- Whole milk (250 ml): This adds moisture and tenderness. Always add it in alternating batches with the flour to prevent the batter from becoming tough.
- Vanilla extract (2 tsp for cake, 2 tsp for frosting): Use pure vanilla extract if you can—it makes a noticeable difference in flavor and warmth.
- Food coloring gels (red, yellow, green, blue, purple): Gel coloring is crucial here because it won't thin out your batter like liquid coloring would. Mix it in thoroughly for even, vibrant colors that don't bleed into each other.
- Powdered sugar (500 g): This creates the silky buttercream that holds everything together. Sift it if it's lumpy to avoid streaks in your frosting.
Tired of Takeout? 🥡
Get 10 meals you can make faster than delivery arrives. Seriously.
One email. No spam. Unsubscribe anytime.
Instructions
- Prepare Your Workspace:
- Preheat your oven to 180°C (350°F). While it's heating, grease and line five 20×20 cm square baking pans with parchment paper. If you only have one or two pans, don't worry—you can bake in batches, letting them cool slightly between rounds. The key is having your pans ready so you don't waste any batter once you've started coloring it.
- Create the Cake Base:
- In a large mixing bowl, beat the softened butter and granulated sugar together. This is where the magic starts. Use an electric mixer on medium speed and keep beating until the mixture transforms into something light, fluffy, and pale—this usually takes about 3 to 5 minutes. You're incorporating air, and you'll see a visible change in color and texture. This step is non-negotiable for a tender cake.
- Add the Eggs:
- With the mixer still running on medium speed, add your room temperature eggs one at a time, beating well after each addition. Wait until the first egg is fully incorporated before adding the next. After the last egg, add your vanilla extract and beat until everything is smooth and well combined. The batter should look creamy and homogeneous.
- Combine the Dry Ingredients:
- In a separate bowl, whisk together the flour, baking powder, and salt. Whisking aerates the flour and distributes the baking powder evenly, which is important for even rising.
- Alternate Wet and Dry:
- Here's where technique matters: alternate adding the flour mixture and milk to your butter mixture, starting and ending with flour. Add a third of the flour, mix gently until just combined. Add half the milk, mix. Add another third of flour, mix. Add the remaining milk, mix. Finish with the last of the flour. Mix until everything is just combined—don't overbeat, or you'll develop the gluten and end up with a tough cake. The batter should be smooth but not overmixed.
- Divide and Color:
- Divide your batter evenly among five bowls. Using food coloring gels and a toothpick, add color to each bowl. Start with just a tiny bit—you can always add more, but you can't take it out. Stir thoroughly until each bowl is a uniform, vibrant color. Be patient with this step; the colors should be deep and even.
- Bake the Colored Layers:
- Pour each colored batter into its prepared pan and spread it into an even layer. Bake for 20 to 25 minutes, or until a toothpick inserted in the center comes out clean and the cake springs back lightly when touched. The tops should be golden but not dark. If you're baking in batches, the cakes should all take the same amount of time since they're the same thickness.
- Cool with Care:
- Let the cakes cool in their pans for about 10 minutes—this allows them to set enough to handle without crumbling. Then turn them out onto cooling racks and let them cool completely to room temperature. This takes about 30 to 40 minutes. Don't rush this; warm cake is delicate and will crumble when you try to cut it.
- Make the Buttercream:
- While the cakes cool, beat your softened butter until it's creamy and pale, about 2 to 3 minutes. Gradually add the powdered sugar, a handful at a time, beating well after each addition. Once all the sugar is in, add the vanilla extract and a pinch of salt. Keep beating until the frosting is fluffy and light. If it's too thick, add milk a tablespoon at a time until you reach a spreadable consistency. The buttercream should be smooth, pipeable, and cloud-like.
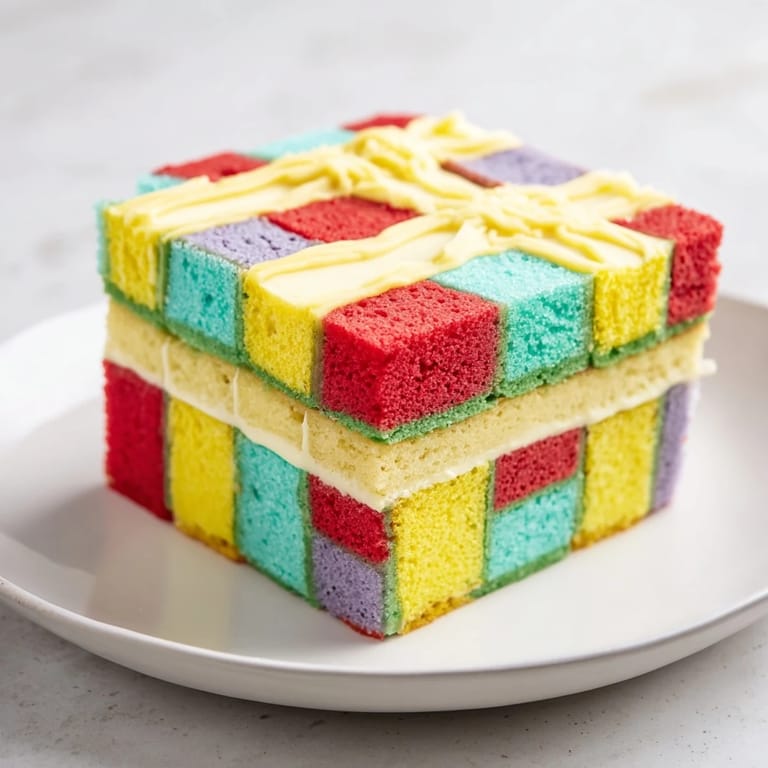
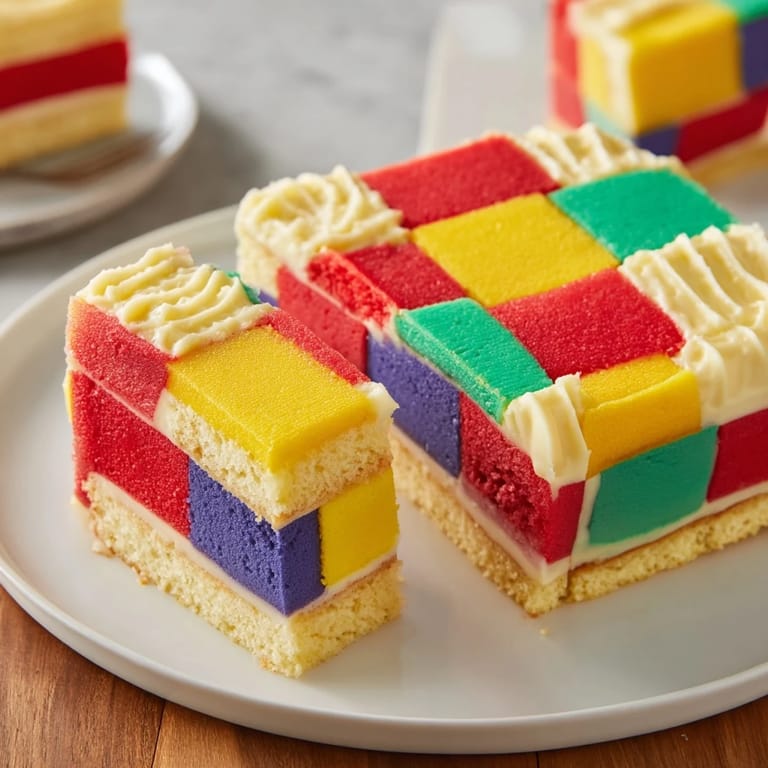
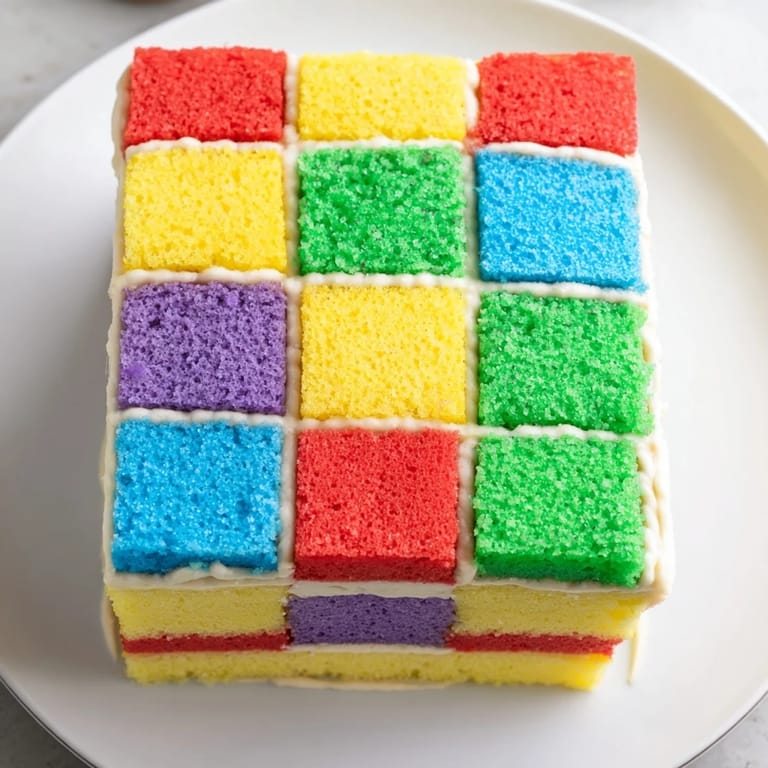
- Cut into Squares:
- Trim the crispy edges off each cooled cake layer—this ensures your squares will look neat and uniform. Using a serrated knife and a ruler as a guide, cut each colored cake into uniform 3×3 cm squares. Precision here will make your final patchwork look intentional and beautiful.
- Build the Patchwork:
- This is where creativity meets structure. On a large, flat serving tray or board, arrange your colored squares in an alternating pattern, creating a checkerboard effect with the colors. As you place each square, add a thin layer of buttercream between them to act as glue and keep everything stable. Build layers, alternating colors as you go up to create that quilted, three-dimensional look. Think of it like building a edible mosaic. You're not just stacking; you're creating a work of art that happens to be delicious.
- Frost and Finish:
- Once your patchwork is complete, apply a thin, even layer of buttercream to the top and sides, smoothing it with a spatula. This not only seals everything together but also gives you a canvas to work with. If you want to enhance the patchwork effect, use a piping bag to pipe thin buttercream lines between the squares, outlining each colored block. This detail makes the quilt pattern even more pronounced and impressive.
- Chill Before Serving:
- Refrigerate for at least 30 minutes before slicing. This helps the buttercream set and the cake to firm up slightly, making slicing cleaner and easier. When you're ready to serve, use a hot, damp knife and wipe it clean between cuts for the neatest presentation.
 Save to Pinterest
 The moment that really cemented this cake's place in my heart was when my elderly neighbor, who had quilted for fifty years, saw it sitting on my kitchen counter. Her eyes filled with tears as she recognized the pattern I'd recreated—not just a quilt design, but a actual patchwork from one of the quilts she'd made decades ago. She asked if I could bake it for her quilting circle's annual gathering, and watching sixty quilters admire a cake that honored their craft was humbling and beautiful.
The Art of Cake Architecture
Building this cake is less like following a recipe and more like constructing something meaningful. Each colored square you cut and place is an intentional choice, and the careful layering with buttercream creates a structure that's surprisingly stable. I've learned that the satisfaction of making this cake comes not just from how it tastes, but from the meditative process of creating order and beauty in the kitchen. Every time you press a square into place, you're adding to something bigger than yourself. That's the real magic of this recipe.
Flavor Combinations That Work
While the vanilla buttercream is classic and allows the rainbow colors to truly shine, there are subtle ways to elevate the flavor without overwhelming the delicate sponge. A touch of citrus zest—lemon or orange—added to the batter brings brightness and sophistication. Almond extract, just ½ teaspoon mixed in with the vanilla, adds a whisper of almond that makes people ask what that delicious flavor is. These additions don't change the appearance or the process, but they transform the taste in surprising ways. It's the difference between a beautiful cake and a beautiful cake that people never stop talking about.
Serving and Storage Secrets
This cake is most beautiful on the day it's made, but it holds beautifully for up to three days when stored properly. Keep it in an airtight container in a cool room, or in the refrigerator if your kitchen is warm. The buttercream protects the sponge from drying out, and the structure becomes even more stable as the buttercream sets. Serve it chilled or at room temperature—both are wonderful. The cold brings out the buttercream's smoothness, while room temperature lets the delicate sponge shine through. Pair it with lightly sweetened whipped cream to add an airy contrast, or serve alongside fresh berries—raspberries and blueberries look stunning against the colorful squares and add a subtle tartness that balances the sweetness beautifully.
- Always slice with a hot knife for clean edges that don't crumble or compress the delicate layers.
- If you're making this ahead, assemble the patchwork the day before but frost it the morning of serving for the freshest appearance.
- Take photos before the first slice—this cake deserves to be documented.
 Save to Pinterest
 This cake is more than just dessert—it's a reminder that with patience, attention to detail, and a willingness to embrace color and creativity, we can make something that nourishes both body and soul. Every time you make it, you're carrying forward a tradition of beauty and care.
Common Recipe Questions
- → How do you achieve the vibrant colors in the sponge?
Food coloring gels are incorporated into separate portions of batter before baking, ensuring bold and uniform hues without altering texture.
- → What is the best way to assemble the patchwork effect?
Cut the cooled colored sponges into uniform small squares and alternate the colors, adhering them together with a thin layer of buttercream for a quilted pattern.
- → Can I make this dessert gluten-free?
Yes, substituting the all-purpose flour with a 1:1 gluten-free flour blend works well without compromising structure.
- → How should the assembled cake be stored before serving?
Chill the finished cake for at least 30 minutes to allow the buttercream to firm up, making slicing easier and preserving shape.
- → What tools are essential for this preparation?
Electric mixer, multiple square baking pans (or bake in batches), mixing bowls, and a serrated knife to cut sponge squares accurately.
- → Are there flavor variations that complement this cake?
Additions such as citrus zest or almond extract can be mixed into the batter to enhance flavor depth without altering texture.