 Save to Pinterest
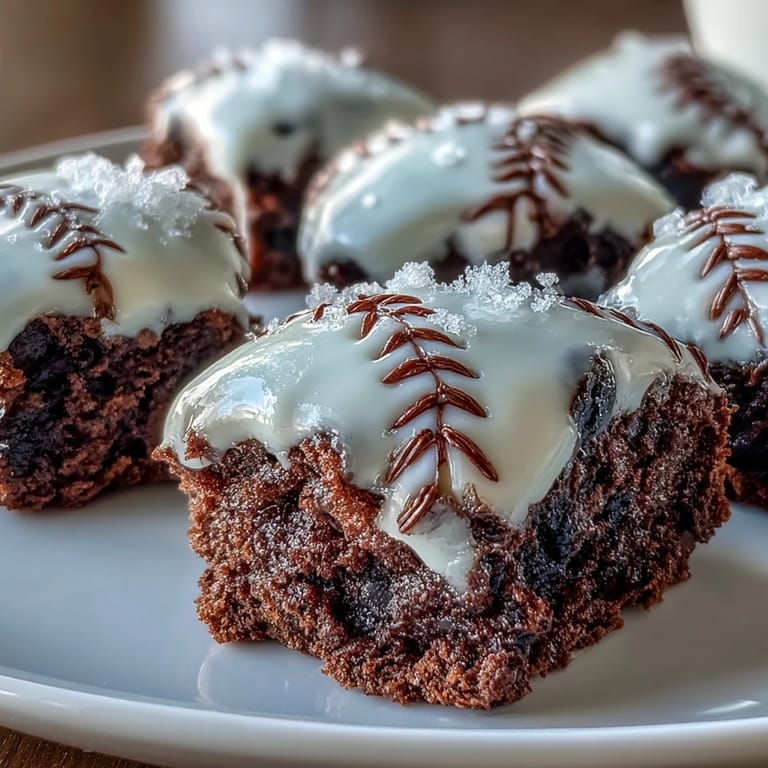
 My nephew showed up to his Little League game with store-bought cupcakes, and I could see the disappointment on his face when another kid's mom arrived with homemade treats shaped like baseballs. That night, I stayed up experimenting with brownie batter and piping bags, determined to create something that would make him feel like a champion before he even stepped up to bat. These fudgy brownie bites with their delicate white icing laces became our tradition—small enough to toss in a cooler, rich enough to taste like real celebration, and fun enough that now the other parents ask for the recipe.
I'll never forget the chaos of my daughter's birthday party last summer when I realized I'd promised twenty-four brownies shaped like baseballs and had three hours to deliver. The oven was running constantly, the kitchen smelled like chocolate heaven, and somehow my five-year-old managed to get white icing in her hair while "helping" decorate. By the time the kids arrived, we had a whole army of little baseball treats lined up on the counter, and watching their faces light up made every messy moment worth it.
Ingredients
- Unsalted butter (115 g): Use good quality butter here because it's doing the heavy lifting in flavor—the chocolate will thank you.
- Semisweet chocolate chips (170 g): These are your foundation for that fudgy texture, so don't cheap out or substitute dark chocolate unless you want a bitter surprise.
- Granulated sugar (150 g): This sweetness balances the chocolate and creates that slightly crispy edge while the center stays tender.
- Eggs (2 large): Room temperature eggs blend smoother and create a better crumb structure—I learned this the hard way with cold eggs.
- Vanilla extract (1 tsp): A small amount brings warmth to the chocolate without making it taste like birthday cake.
- All-purpose flour (65 g): Keep this measurement exact because too much flour turns these into cake, and too little makes them fall apart.
- Salt (1/4 tsp): This tiny pinch amplifies the chocolate flavor and prevents the brownies from tasting one-dimensional.
- Powdered sugar (60 g): For the icing, sift it first if you have time—lumpy icing won't pipe cleanly.
- Milk (1-2 tsp): Add it slowly because you can always add more, but you can't take it out once it's too thin.
- Vanilla extract for icing (1/4 tsp, optional): A hint of vanilla in the icing keeps it from tasting like pure sugar.
Tired of Takeout? 🥡
Get 10 meals you can make faster than delivery arrives. Seriously.
One email. No spam. Unsubscribe anytime.
Instructions
- Preheat and prep:
- Set your oven to 175°C (350°F) and get that mini muffin tin ready with either a light grease or paper liners—I prefer liners because they peel away so cleanly when the brownies are still warm.
- Melt the chocolate moment:
- Combine the butter and chocolate chips in a microwave-safe bowl and melt in 30-second bursts, stirring between each round until everything is silky and smooth. This method prevents the chocolate from seizing or burning, which I learned after one unfortunate incident.
- Build the batter base:
- Whisk in your sugar until combined, then add eggs one at a time, whisking well after each egg—this creates a lighter texture than dumping them all in at once.
- Fold in the dry goods:
- Add vanilla extract, then gently fold in the flour and salt with a spatula or wooden spoon, being careful not to overmix. Overmixing activates too much gluten and makes the brownies tough and cakey.
- Fill the tin:
- Divide the batter evenly among the cups, filling each about 3/4 full—this gives them room to rise slightly without spilling over the edges.
- Bake with attention:
- Bake for 16 to 18 minutes until a toothpick inserted into the center comes out with just a few moist crumbs clinging to it. Every oven is different, so start checking at 16 minutes to avoid overbaking.
- Cool with patience:
- Let them sit in the tin for 5 minutes so they firm up enough to move, then turn them out onto a wire rack to cool completely. This waiting period is crucial because decorating warm brownies will smudge and melt your icing.
- Make the icing:
- Whisk together powdered sugar, 1 teaspoon of milk, and vanilla extract, adding more milk just a drop at a time until you reach a thick but pipeable consistency. The icing should hold its shape when piped but not be stiff as cement.
- Pipe the baseball laces:
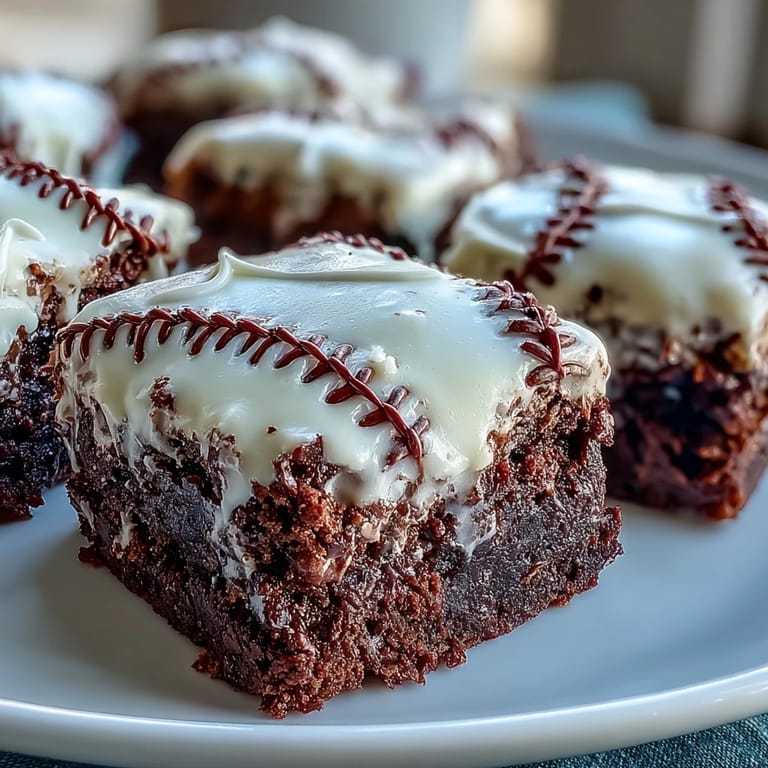
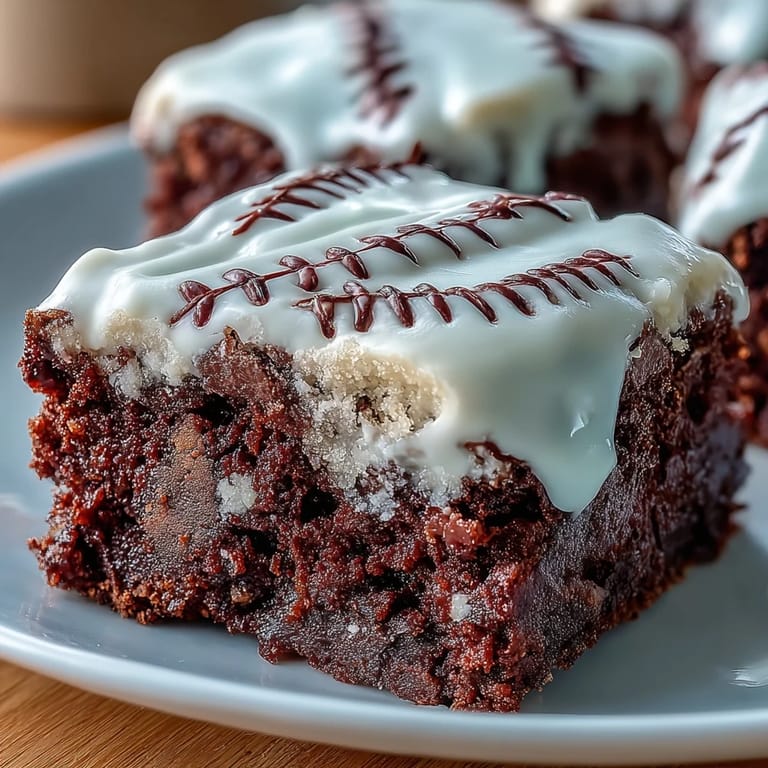
- Fill a piping bag or small zip-top bag (snip off a tiny corner) with your white icing and pipe two curved lines across each cooled brownie bite, then add small perpendicular lines crossing those curves to resemble classic baseball stitching.
- Set and serve:
- Let the icing set for 10 to 15 minutes before serving or stacking them in a container.
 Save to Pinterest
 There's something magical about watching someone bite into a brownie and immediately recognize it as a baseball without you having to explain it—it's the kind of small delight that turns an ordinary dessert into a memory. My kids now request these for every spring celebration, and I've stopped being surprised when classmates ask their parents why their brownies don't look like sports equipment.
Storage and Keeping
These brownie bites stay fresh and fudgy for three days in an airtight container at room temperature, which is honestly longer than they usually last in my house. If you need to make them ahead, you can bake and cool the brownie bites one day in advance, then decorate them the morning of your event so the icing stays bright and clean.
Flavor Variations That Actually Work
The beauty of these little bites is that they're a blank canvas for customization without losing what makes them special. I've stirred in mini chocolate chips for extra fudginess, added crushed pretzels for a salty-sweet contrast, and even mixed in a tablespoon of instant espresso powder to deepen the chocolate flavor for adult palates.
Making These Extra Special
The first time I added red food coloring to the icing, I realized I'd been missing an entire dimension of impact—suddenly these brownies didn't just taste like celebration, they looked like it too. A few drops of gel food coloring mixed into the white icing creates that authentic baseball stitch look, and you can even use two piping bags if you're feeling fancy—one with white and one with red. The details matter when you're making treats that are meant to bring joy beyond just flavor.
- Try red food coloring in the icing for a truly authentic baseball appearance.
- You can make these up to a day ahead and store them in an airtight container without the icing getting weird or soggy.
- If you're decorating for a large crowd, pipe all the icing in advance and let it set fully before stacking them in boxes.
 Save to Pinterest
 These brownie bites have become my secret weapon for turning ordinary moments into celebrations, whether it's a game day, a birthday, or just because someone deserves a treat that looks as good as it tastes. Make a batch this week and watch how something so small can bring so much joy.
Common Recipe Questions
- → How do I make the white icing for the brownie bites?
Mix powdered sugar with a small amount of milk and optional vanilla extract until you reach a thick, pipeable consistency.
- → What is the best way to pipe the baseball laces onto the brownies?
Use a piping bag or zip-top bag with a small tip to draw two curved parallel lines, then add small perpendicular lines to mimic baseball stitching.
- → Can I add ingredients to the brownie batter?
Yes, adding chocolate chips or nuts can add texture and flavor variations to the brownie bites.
- → How long should I bake the brownie bites?
Bake for 16-18 minutes at 175°C (350°F) until a toothpick comes out with moist crumbs, avoiding overbaking.
- → How should I store the brownie bites?
Store in an airtight container at room temperature for up to three days to maintain freshness.